REPRODUCING PINBALL PLASTICS & DECALS
Made Easy
By Roc Agrwal
roc10@hotmail.com
October, 2000
Also check out the alternate method, updated Feb. 2001
![]()
Table of Contents:
Application_of_the_Film_to_Plastic
![]()
The method of plastic reproduction described here is intended for personal use only. The author takes no legal or financial responsibility for the misuse of this information with regards to copyright violations. In addition, the methods described here are provided as a service and are to be attempted at the reader's OWN RISK.
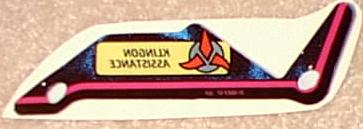
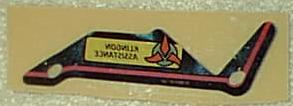
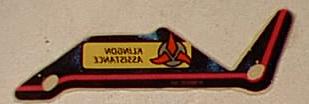
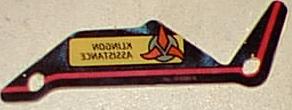
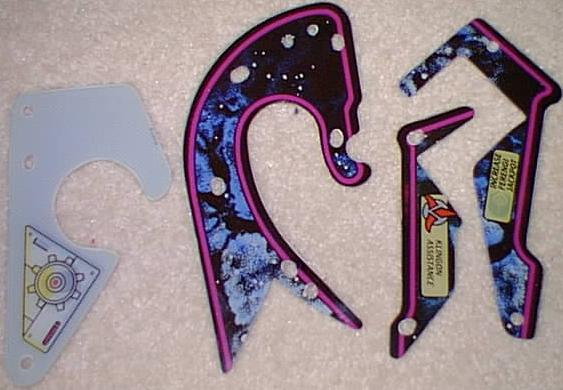
Does this look familiar?
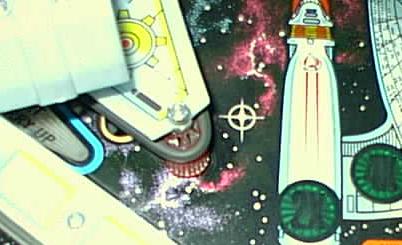
I started to work on reproducing plastics after I got my Star Trek-The Next Generation pinball machine. It had a few broken plastics in all of the typical locations. After seeing the cost of buying an NOS set, I decide that it was worth trying to re-create my own.
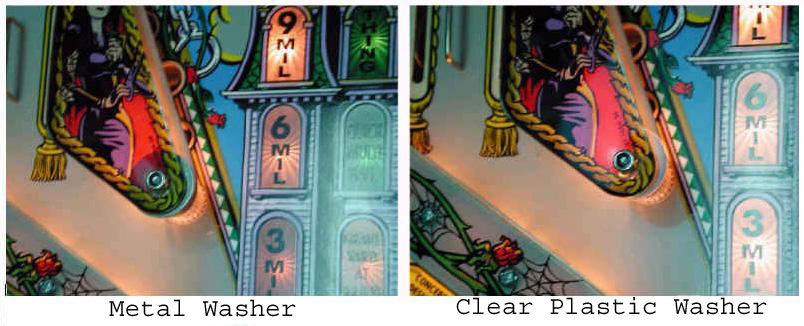
Prevention first! The best advice I can give is to not break your plastics in the first place! Use fender washers where ever possible. You can also cut your own protective guards that stick out beyond vulnerable plastics. Click here for more info on clear plastic fender washers.
There are 2 types of plastics that are being reproduced on the market right now. The first is the best in terms of visual quality and closest to the original. That is the Silk Screen version. This method usually involves working with a professional printer to make your silk screen plates. Once all of the images are sized, colors are matched and separated, this method closely resembles what the manufacturer did to produce the plastics in the first place.
The second type of plastic reproduction is digital reproduction. Using the ever-improving capabilities of a home computer, an average computer user can produce a very nice looking plastic. It will not compare to a silk screen version when put side by side, but when it's under a pinball glass, it will take a keen eye to spot it.
In summary, this method is not going to produce an original, it is going to produce a nice looking REPRODUCTION!
Another good resource to use when experimenting with plastic reproductions is Dan Wilga's Guide to Reproducing Pinball Playfield Plastics.
What makes this method different and easier than others is that it uses a new INKJET PRINTABLE CLEAR ADHESIVE BACKED FILM. This allows you to skip the process of dealing with messy glues, and unreliable bonding techniques that can leave bubbles in your plastics.
Necessary Equipment:
There are basically 2 materials we will need; clear plastic and clear inkjet printable film.
There are 3 types of plastic that should be used for reproducing plastics; Polycarbonate (aka Lexanä or Hyzodä ), Acrylic (aka Plexiglassä or Luciteä ), and PET-G.
I only use Polycarbonate. It has 30 times the impact strength of Acrylic, and has a higher melting temperature than Acrylic or PET-G.
PET-G is my second choice. It has strength characteristics similar to Polycarbonate, but it gets soft at 160° . That means that it might start to sag when it is over a hot GI bulb.
For information on the strength characteristics of Hyzod™ polycarbonate, checkout the Sheffield Plastics web site:
I typically get 1/16" (0.060") polycarbonate, which is the same as the original plastic thickness. Thinner sizes (0.040") can also be used. This will easier to cut, and will be a lot more flexible then the thicker pieces. It is less likely to break or chip then a 1/16" piece. The only problem with the thinner material is that it may look funny next to a thicker piece. The thinner material is also more expensive then the 1/16".
A good place to find small quantities of polycarbonate is through your local sign or graphics/printing shop. They should be able to sell you the right stuff, or point you to a distributor that will have it. You can also check out my Plastic Reproduction Starter Kit.
Try to purchase sheets that have a paper liner on both sides. Avoid the sheets that have a plastic liners, as they don't adhere as well, and will probably have to be removed and replaced with tape.
The second item that you will need is inkjet printable clear adhesive backed film. I have found a new product that allows you to print high resolution images from a standard inkjet printer onto a clear film that can be peeled and stuck onto a piece of plastic. This can be used for PLASTIC REPRODUCTION, or DECAL REPRODUCTION.
This media can be purchased from my Plastic Reproduction Starter Kit page.
If you have an NOS plastic or know someone who does, your best bet is to scan the original in a flat bed scanner at 600 DPI. I like to scan in True Color (24 bits) but you can probably use any setting greater than 256 colors. You should then save that image in a TIF file. This uses a lot of space and CPU time. If you computer is not up to the task, try scanning at 300 DPI, but make sure you save in a non-lossey format like TIF or PSD. This will make it easier to modify the image later, and minimize quality loss.
Scanning an 8.5"x11" area at 600 DPI and saving it in TIF format is approximately 100MB. A 300 DPI scan of the same area in TIF format is approximately 25MB. Rule of thumb: double the resolution quadruples the size of the image.
My hope is to create a plastic scan repository where good clean scans are available for people so they don't have to try and recreate a broken plastic.
If you are unlucky enough to not have access to a good plastic, or scan, go to Dan Wilga's Guide to Reproducing Pinball Playfield Plastics site for instructions on how to scan and reconstruct a broken plastic.
A quick note on scanners, if you are going to purchase a scanner, be sure to get one that has a 600 DPI optical resolution as a minimum. Interpolated resolution is meaningless when it comes to good quality scans. My personal preference is for a scanner that uses a florescent tube as the light source. Some of the newer slim line scanners (Canon) use LEDs as their light source. This is good for completely flat images, but is terrible for warped plastics, or decals that are not completely flat.
I need to defer most of my advice on editing your images to Dan Wilga's Guide to Reproducing Pinball Playfield Plastics site. Most of what I do is based on his recommendations. I do recommend using Adobe Photoshop 5.0 or higher. This software seems to have some excellent features for editing images, manipulating colors and reconstructing broken plastics. Be sure to spend some time calibrating your display so that what you see on your monitor is what you are going to get. There will be more information on calibration in the PRINTING YOUR IMAGE section.
The quality of your reproduction is going to be proportional to the time you take in editing your image. No scan is perfect, and there are always touch ups to be made. If there are areas of solid color in your plastic, it will probably not be solid on your scan. The scanner will usually dither a solid color into several colors that are close. For example, a solid blue area on your plastic may scan as a combination of 4 or 5 different blues dithered together on your image. This happens because the light from your scanner has to go through a layer of plastic to get to the image, and the light is being reflected off in different directions. This somewhat depends on the quality of the scanner, but it will happen on the best of scanners to some degree.
There will almost always have to be some adjustments made to the brightness and contrast of the scanned image. This is where a TIFF image is nice to deal with. It contains all of the original information, some of which is lost with a format like JPG.
Since you will be printing this image on adhesive film that is relatively expensive, you should probably try and cram as many images on one 8.5"x11" sheet as possible.
After you have your image just the way you want it, be sure to print it out on high quality photo paper to make sure that it looks as good on paper as it does on the screen. You may find that the colors are way off. There are three variables here:
You need to have a good quality printer to make a nice looking plastic or decal. Luckily, most of the color inkjet printers made in the last 2 years are decent quality. Some minimums that I try to observe are:
My personal preference is for a 6 color printer (CcMmYK). This gives you the best color matching, although it is not widely available on lower end printers. (Epson does make some low end 6 color printers).
NOTE: Generic ink is NOT as good as the manufacturer's ink. Minor variations in viscosity can make a big difference in print quality. Stick with the more expensive manufacturer's ink.
Some printers have drivers that try and optimize each image. The problem with this is that they are trying to optimize for a photograph, not a pinball plastic or decal that only has a few colors. My recommendation is to TURN OFF ANY PRINTER DRIVER COLOR MANAGEMENT. This is especially true if you are using Photoshop to do your editing and printing.
The settings for my Epson Photo 700 are:
Media type: Plain Paper
Resolution: 720 DPI
Superweave - On
Finest Detail - On
Fine Dithering (not Error diffusion)
Set printer to thicker paper
Adobe Photoshop has some excellent print drivers for color reproduction. It can easily handle reproducing the right colors on most modern inkjet printers. Once you go to Photoshop's Print menu, you need to uncheck the box that says something like "Printer color management". You need to also be sure that the printer driver color management is turned off in Windows 9x.
If the image that you print out is not quite what you were expecting, you may have to edit the image more. This will again be dependent on the quality of the scanner and quality of the printer. You may have to modify the brightness, contrast, Hue or Saturation of the image. You may have to modify individual colors, if your printer is having a hard time reproducing them off the scan. You may even have to modify your monitor settings so that the colors you see on the screen are the same as the colors you see on your printer.
Assuming that your image looks the way you want it on paper, SAVE IT!!
If you are making a plastic or an under ramp decal, then flip the image over, or mirror it. Save a mirrored copy. This is the image that will actually be printed on the clear adhesive film.
If you are making a decal for a drop target or spinner you won't need to mirror the image.
Put the clear adhesive backed film in the printer and select PRINT within your photo editor. You should make one final check of your Windows9x printer driver. You want to make sure that your printers color management is turned off, AND you want to make sure you have selected the print media and resolution.
Print the image out and wait for it to dry completely, this can take 20 minutes to 4 hours.
If you are making a decal for a drop target or a spinner, you are basically done. All that is left to do is to put a protective coating over the image. Mylar would be a good choice.
Please READ the Disclaimer section. Attempt this at your own risk!
You must use a plastic sheet with a paper backing when cutting with any kind of rotating equipment. Do NOT put a plastic sheet with a plastic film backing on a router or Rotozip™. This can be extremely dangerous. If your plastic sheet is covered with a plastic film, remove the film and put masking tape over it.
Polycarbonate is such an excellent material to work with, you can cut it with many types of tools. PET-G is also easy to work with. Acrylic will tend to chip and crack if you are not very careful with it.
I have used a:
If you have a table scroll saw with a 360° blade, you can easily cut out complex shapes.
A Router is an excellent choice if you are going to make multiple plastics of the identical shape. You need to make a wooden template and purchase a router bit with a guide bearing.
I don't care for free hand routing, because you need to hold the plastic very tightly, or risk having it thrown across the room.
Never wear loose clothing around rotating equipment!
These are like a mini hand held routers. Make sure you are using a plastic cutting bit.
I prefer to use a Rotozip™ bit in a Drill Press. A drill press only turns at 3000 RPM, versus a router at 25,000 RPM. A drill press with a Rotozip™ bit is easy to control and doesn't throw plastic everywhere.
![]()
You can find some very good information on fabricating Hyzodä at the Sheffield Plastics Inc. web site.
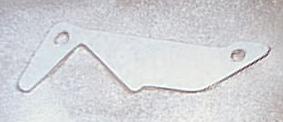
Rough Cut Your PlasticMy first pass at cutting the plastic is to cut a rectangular shape that is bigger than the image you have just printed. The goal here is to have a smaller piece of plastic to work with for ease of handling. Make sure you cut it out at least a couple of inches bigger than the image so you can still work with it without losing a finger.
Remove the paper backing from one side of the plastic sheet. This is where the image will be added.
Application of the Film to Plastic
Cut out the image that you printed on the clear adhesive film with some sharp scissors. Cut it out a little bigger than the actual image. I usually leave 1/4" to 1/2" around the edges. You now have a decal.
Peel the backing off the decal, being careful not to double it over.
Adhere the decal to the rough cut plastic (side without the paper backing) by starting at one end, and lightly using your finger to go back and forth across the image until you get to the other end. The goal here is to minimize bubbles. You want to start at one end and push the air out as you work towards the other.
You now need to press your decal onto your plastic better without damaging the printed image. The best way to do that is to use a rolling pin, or a metal roller (like on a conveyor). A laminate roller can also work, but it is a little too soft and will not put enough pressure on your plastic.
I usually put a piece of paper over the image before using any kind of roller. That will minimize the possibility of smearing the ink on the decal.
Put a lot of downward pressure on your rolling pin. You won't damage the plastic or the decal.
After rolling, if you notice any major bubbles, you can use a pin to gently pop it. Then use your fingers to try and push all the air out and press the decal onto the plastic. Then go back over it with the rolling pin. Minor bubbles will not be noticeable after the piece is in the machine.
You can now finish cut around your image on your decal. Using whichever method you chose, cut the plastic to within a 1/16" or 1/32" of the edge of the image.
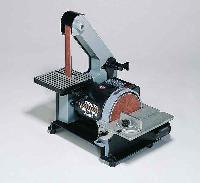
After you are done cutting, you need to finish sand the plastic. I find that a 1" belt/ 5" disc sander works the best.
I have also used grinding wheels, and sanding drums on my Dremel™ tool and drill press (this is very handy for the slingshots on ST:TNG).
After the edges are done, you need to drill or route out the holes where the screws will go. Be sure to drill from the decal side (the other side should still have the paper backing), so you wont be lifting the decal off the plastic. A round file can help with slotted holes.
Be very careful not to damage your decal, and waste all of your hard work!
Now for the final touches:
Make sure there is no loose material on the surfaces of the plastic/decal. Compressed air can help remove some of the dust.
I like to use white spray on primer to put a backing on the decal. It lets more light through then white spray paint. Put on 1 medium thick coat of primer on the decal side of your plastic. Make sure you get good coverage on the entire surface, but you don't want it too thick, so plenty of light can come through. Ideally, you want to barely see the decal through the primer. You may want to try and put tissue paper in the holes to keep primer from getting on the inside of a hole, or seep up under the paper on the top of the plastic.
After your primer is dry, check the coverage. If there are any bare spots, spot spray them.
Be sure to scrape or sand off any primer from the edges of the plastic before going to the next step.
After you are done with the primer, you can spray on a coat of Varathane™, or any clear water based Polyurethane to protect the primer from damage. If the plastic is going to put in an area where it could move around, you may want to cover the bottom with mylar so the posts don't rub through the image. You see that all the time with original plastics.
Now it's time to peel off the paper backing that has been protecting the top of your plastic.
To get a nice edge on your plastic, you can use a sharp utility knife or Exacto™ knife to scrape off any loose plastic, paint or ragged edge on the decal.
I don't recommend using a propane torch or chemicals, as they will damage the decal (and they are a lot more dangerous).
RESULTS:
See the alternate method, updated Feb., 2001